
Nail Tech Manager allows you to manage all of your clients, bookings, services and stock information in one place. It has been designed by Nail Technicians for Nail Technicians and will continue to be improved and shaped based on the feedback from its users.
MAIN FEATURES
- Designed for iPad, iPhone and iPod touch.
- Automatically sync your data with all of your iOS devices using iCloud.
- Block out time for holidays, doctor appointments.
- Find clients, bookings or stock with the new search function.
- A built-in calendar that shows upcoming client birthdays, bookings and events.
- Create up to 26 bookings in advance based on any existing booking.
- 4 colour schemes: Dark, Light, Plain and Flux.
- Create Services, Clients, Bookings and Stock Items.
- Create Reports which can be emailed as HTML, PDF or printed directly to AirPrint printers.
- Mail Centre: iMessage/SMS*/Email booking reminders to your clients. *iPhone version only.
- Loyalty Points: Clients can earn and redeem points for using your services.
- Export your clients, bookings, services and stock data to .csv files (which can be opened by spreadsheet programs like Numbers, Excel etc.)
- iTunes File Sharing allows you to export/backup your entire database if you don't use iCloud.
MORE GREAT FEATURES
- Touch a day in the built-in calendar to zoom in for more details.
- Calendar months are tinted different colours to help define them.
- For mobile Nail Techs, client addresses can be added automatically into calendar bookings. When using the Calendar App, touching the client address in the booking opens up the Maps App ready to provide you with directions.
- Apply percentage or value discounts to bookings.
- See a booking history for a client within their Client Card.
- Create new bookings from within the Client Card or the Main Menu.
USER GUIDE
First Time Use
Nail Tech Manager has features that require access to your Calendar. It creates and manages its own calendar for bookings and events which allow it to determine whether double bookings are made and also to create alarms to remind you of bookings. It does not access or use any other calendars that you may have.
When prompted, please allow Nail Tech Manager access to your Calendar to take full advantage of all its features.
Updating to v3.0 (or later): Data Storage Selection
You will be presented with the choice of using iCloud or Local storage.
iCloud is the recommended option. The Change Storage button will allow you to change this setting if you decide to change your mind later.
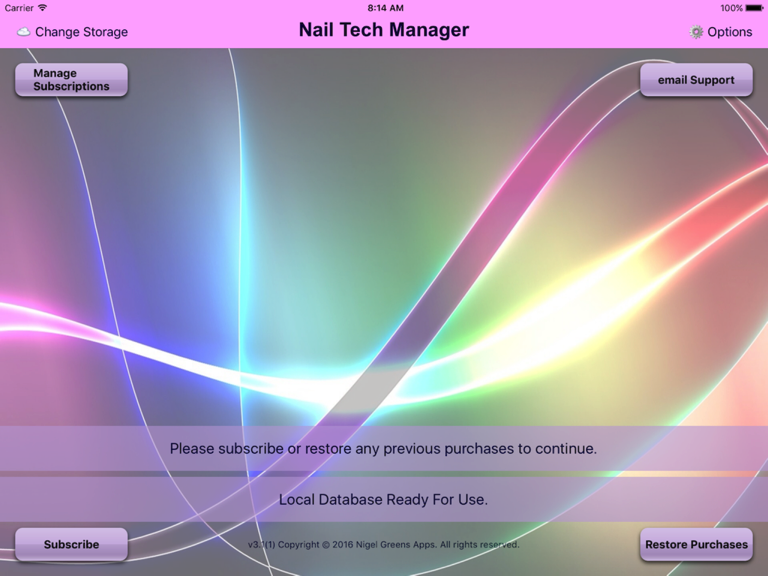
Subscription (does not apply to users who purchased NTM prior to v3.1)
Nail Tech Manager has an auto-renewable monthly subscription that can be cancelled at any time.
To start your subscription, touch the Subscribe button to display the monthly amount in your local currency.
If you upgrade your device or restore from a backup, you can use the Restore Purchases button to re-activate an existing subscription if necessary.
If you require technical support, please use the email Support button to contact the developer directly for assistance.
You can turn off auto-renewal using the Manage Subscriptions button or within your iTunes Account settings.
Calendar
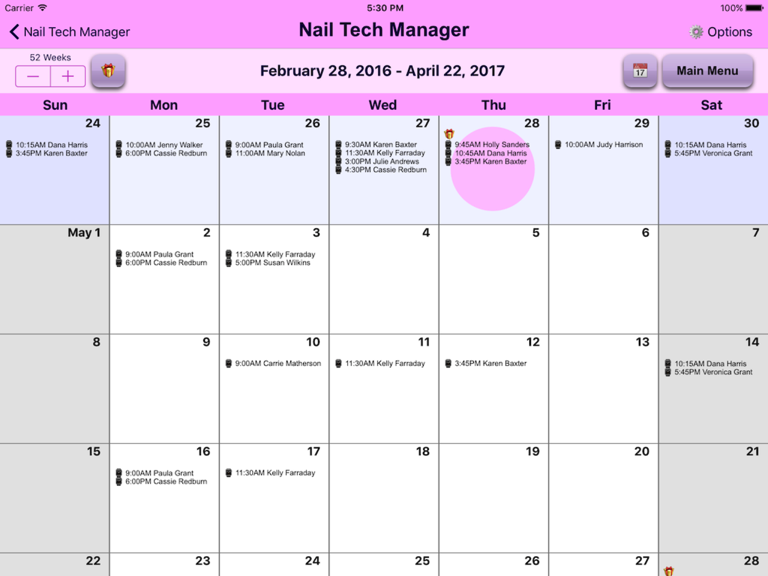
Nail Tech Manager has its own built-in Calendar that shows upcoming events, bookings and client birthdays.
This 8 to 52 week Calendar automatically advances each week, always showing the previous 8 weeks plus another 8-52 weeks in advance.
Use the plus and minus at the top left of the Calendar screen to set how many weeks are displayed at once. This is not required to be changed very often but you can change this setting as often as you need to.
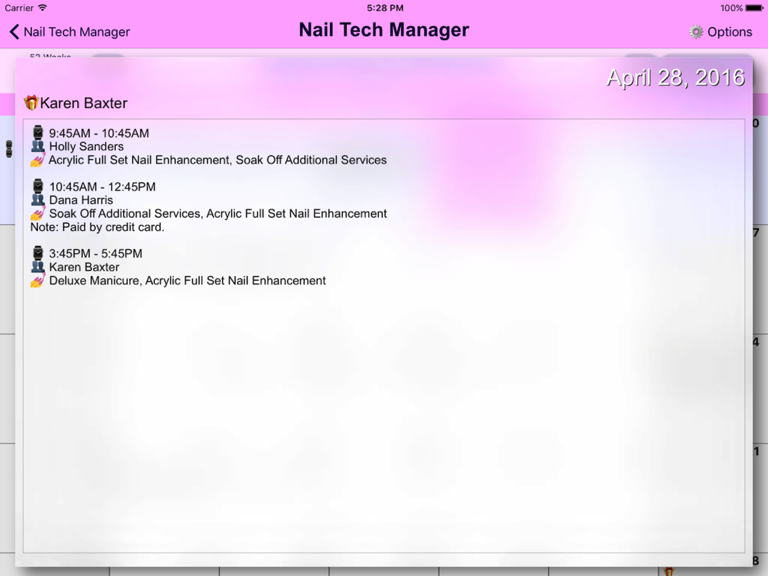
Tip: Touch a day in the Calendar to zoom in for more detail.
iCloud Calendar
Using the Calendar App (by Apple), you can optionally share your Nail Tech Manager Calendar with others so they know your booking schedule (e.g. staff or spouses).
You can also access your iCloud calendars from any Mac or PC. Please refer to the Apple documentation for details.
Upcoming Birthdays
Clients with upcoming birthdays are displayed on the Calendar. Touching the button with the Gift icon will show a list of all upcoming birthdays and how many days away they are.
Creating Custom Events with the New Event Creator.
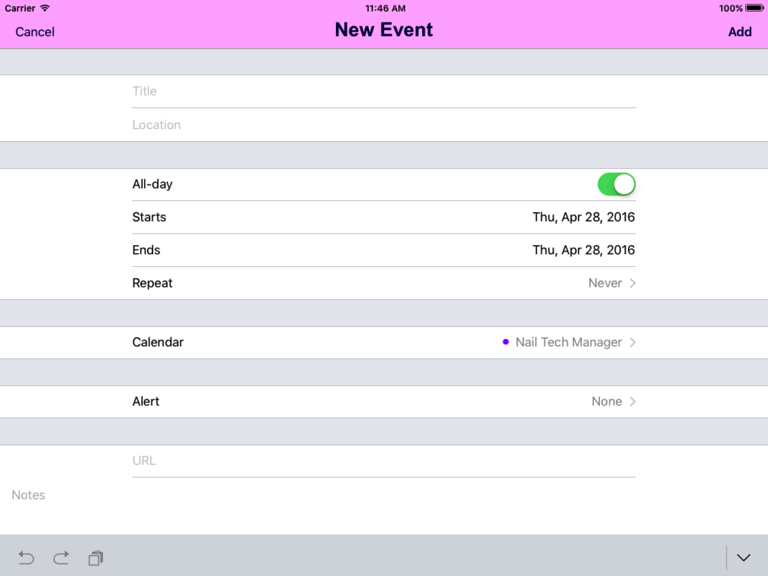
You can create your own custom events with the Event Creator which will prevent bookings during the time periods you choose.
Services

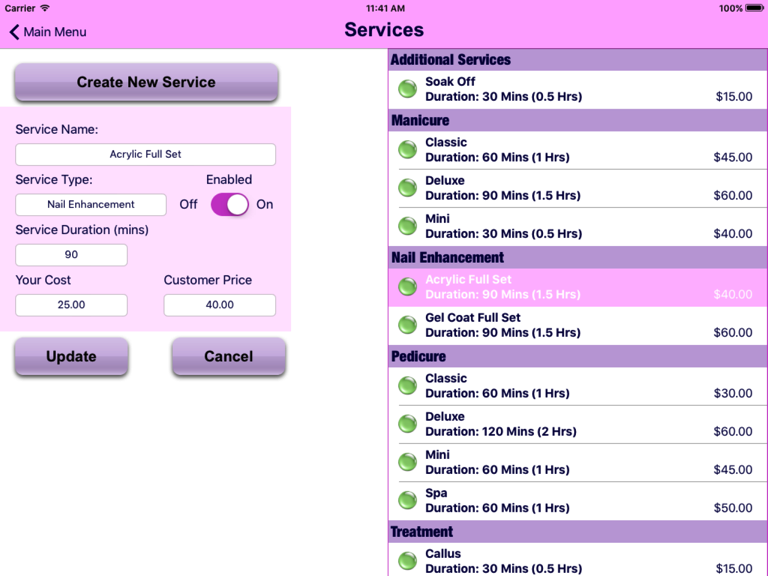
Upon starting Nail Tech Manager for the first time, you begin by adding in the Services you provide.
Each service has the following information: Service Name, Service Type, Service Duration, Your Cost, Customer Price and Enabled.
When creating your Services, you should keep in mind that the full description of a Service is the Service Name and Service Type combined together.
A Service Name for example, could be something like: "Paraffin Wax”
The Service Type is used to group the Services together. An example could be: "Treatment"
When combined together they become "Paraffin Wax Treatment”. This would then be used throughout Nail Tech Manager as a full description for this Service.
However, if you chose a Service Name like “Mini Manicure” and a Service Type of “Manicure” it would appear as “Mini Manicure Manicure”.
Service Duration is how long it takes to perform the service (in minutes).
Note: There is no need to include preparation time between bookings as this can be added as a separate option.
Time Conversion Formulas
Minutes To Hours: m / 60 = h
e.g. 150 mins / 60 = 2.5 hrs
Hours To Minutes: h * 60 = m
e.g. 1.5 hrs * 60 = 90 mins
Your Cost is how much a service costs you to provide. It will be used by future Nail Tech Manager features but until then it is just for reference.
Customer Price is how much you charge your customer for this Service. This is used to help determine the Booking Total by adding up all the Booked Services when making a booking.
Enabled is for when you wish to temporarily hide a Service from the available choices when making a booking. For example: Special offers or discounts.
Deleting A Service
If you decide you no longer want to provide a Service, you can delete it permanently by using the right to left swipe gesture on the Service to reveal the Delete button. Touch this button to delete the Service.
Clients

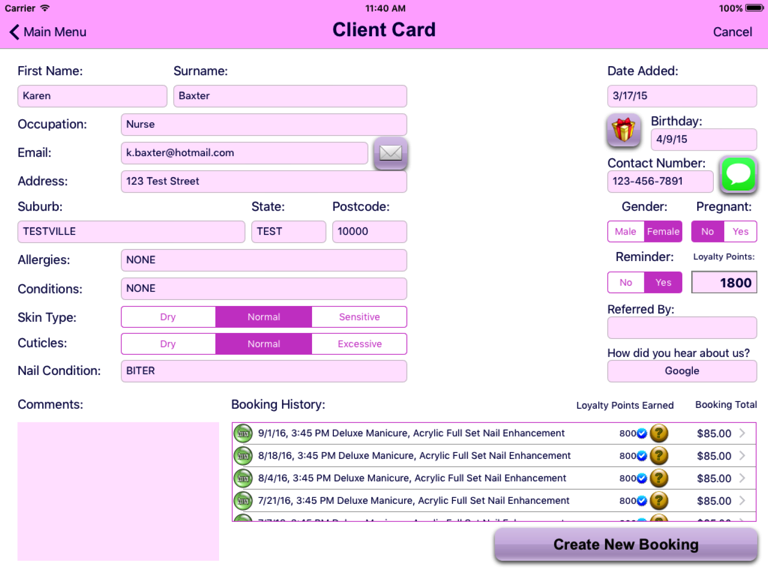
Once your Services have been entered, you should now create your clients.
You can record many different pieces of information for each client but only their first name and surname are a requirement for the Client Card to be considered completed.
If you know your client’s birthday (only the day and month is needed as the year is not used) you can touch the Gift Icon to select a date. Their next birthday will appear in the Upcoming Birthdays and on the Calendar screen.
If your client has an email address and you add it to the Email field in their Client Card, you can touch the Envelope Icon to auto-address a blank email ready for you to add your message.
Email and the Contact Number are also used in conjunction with the Reminder setting for Mail Centre.
As of v3.0, you can now email, iMessage and SMS* your clients from their Client Card and Mail Centre. *iPhone version only.
Booking History
Existing clients with at least one booking will have their bookings appear in the Booking History.
You can select a booking in the history to open it in the Bookings screen for viewing or editing.
To create a new booking for this client, touch the Create New Booking button.
Each booking listed also shows the amount of Loyalty Points that this booking earned or will earn once completed.
A symbol after the points shows their current status.
Loyalty Points
Each client has a Loyalty Points balance in their Client Card. You can manually change this value at any time or let it accumulate automatically when you accept points using the Loyalty Points screen.
A comments section is also available for each client.
Deleting A Client
When using the Main Menu, you can delete a client permanently by using the right-to-left swipe gesture on the Client to reveal the Delete Button. Touch this button to delete the Client.
WARNING: This will also delete all bookings for this client.
Bookings

Once you have your Services and Clients entered, you are ready to create a booking.
Creating a booking is very quick and easy.
1. Select a client (touch the Select Client button and choose from your Clients listed).
2. Choose the requested Services. (touch the Select Service button and choose each Service that applies).
3. Choose a booking date and time. (if you have prevented Double Bookings you will be notified when trying to Save if this booking clashes with another).
4. If applicable, enter a discount for this booking. e.g. for 5% enter 5
Preparation Time
This is used to give you time to set up for your next client or to give you some “breathing space” between clients.
This is set in the Options screen and will be added to each booking duration.
Services Total and Booking Total
The Services Total is the total value for all selected services before discounts.
The Booking Total is the Services Total less any discounts.
Removing A Booked Service
To remove a Service from a booking use the right-to-left swipe gesture on the Service to reveal the Delete Button. Touch this button to remove the Service from the Booked Services.
At the bottom of the screen is the Booking Total, Booking Duration and Estimated Finish Time.
Note: The Estimated Finish Time includes any Preparation Time you have requested in the Options screen.
A comments section is available for each booking.
Deleting A Booking
You can delete a booking permanently by using the right to left swipe gesture on the Booking to reveal the Delete Button. Touch this button to delete the Booking.
Note: This also removes the Calendar event for this booking.
Redeeming Loyalty Points
Please refer to the Loyalty Points section below.
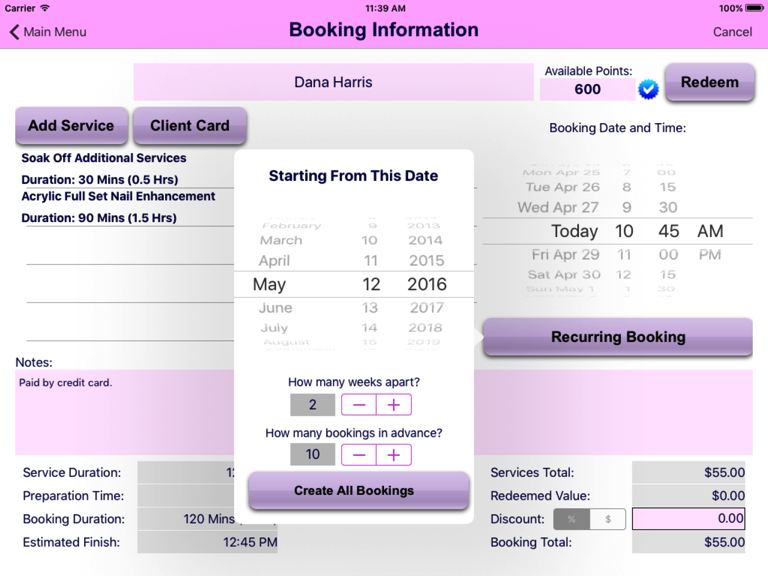
Recurring Bookings
Any existing booking can be duplicated up to 26 times at once, spaced apart by 1-12 weeks.
New bookings must be saved before the Recurring Booking button is made available.
To create multiple bookings in advance:
1. Choose your next booking date.
2. Choose how many weeks apart the bookings should be.
3. Choose how many bookings you wish to create.
4. Touch the Create All Bookings button.
Please Note: Be certain your choices are correct as this cannot be undone. Once the multiple bookings have been created, if you wish to remove any they will need to be deleted individually on the Main Menu as you would normally delete a booking. (Swiping right-to-left to reveal the Delete button)
Stock

You can keep track of your stock by creating Stock Items.
Each item has an Item Name, Item Type, Brand, Supplier, Replacement Value, Item Size, Unit of Measure, Item Quantity and an Item Photo.
An Item Name could be something like: “Twilight Red”.
The Item Type is used to group the Stock together. An example could be: “Acrylic Nail Polish”.
Each item can have an optional photo, taken using the device camera. Touch the Take Photo Button to display the camera controls.
If you want to replace an Item Photo, touch the Take Photo Button again and repeat the process.
You can also remove the Item Photo altogether by touching the Remove Button.
Reports

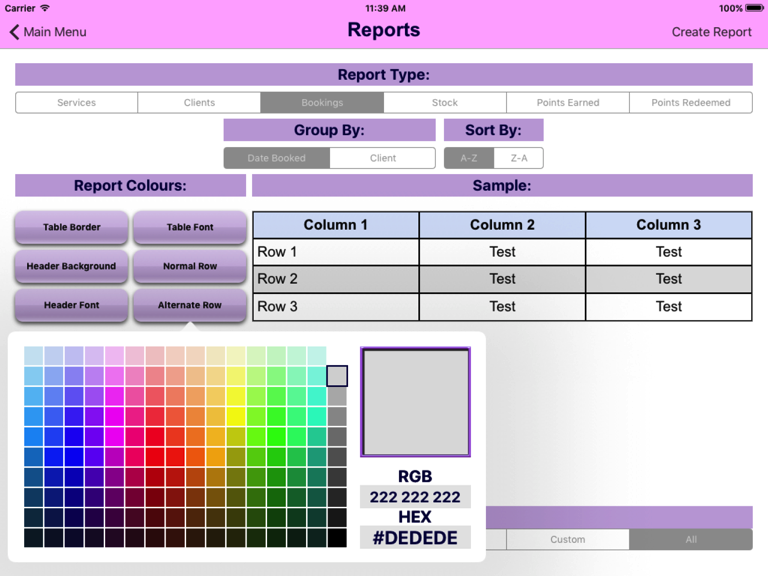
You can create reports by first choosing a Report Type based on Services, Clients, Bookings and Stock.
Each Report Type has different Group By options and whichever is chosen can be sorted in ascending or descending order.
A sample of how the report will look is shown alongside buttons for the Report Colours.
The following report colours can be changed:
• Table Border Colour
• Header Background Colour
• Header Font Colour
• Table Font Colour
• Normal Row Colour
• Alternate Row Colour
Clients and Bookings both have date fields you can use to filter your report criteria.
Whenever a client is created, the current date and time is recorded for you in their Client Card automatically.
Using this date, you can see how many new clients you have created during a time period you choose.
Bookings use the date and time of the booking.
There are 6 Date Range Presets available to you when you choose either a Clients or Bookings Report Type.
• Today
• Last 7 Days
• Last 14 Days
• Last 30 Days
• Custom
• All Time
Once you have chosen your options you can touch the Create Report button to see the report.
If you wish, you can now choose to email the report as HTML or PDF. Users with an AirPrint compatible printer can also print the report directly.
Mail Centre

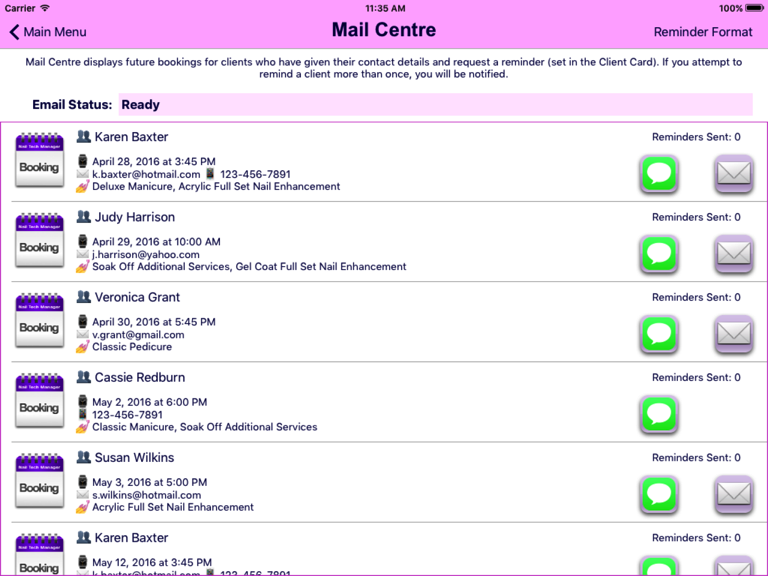
Mail Centre displays future bookings for clients who have given their contact details and request a reminder (this option is set in the Client Card).
If you attempt to remind a client more than once, you will be notified before you send another.
You can choose to iMessage, SMS* or email a client. *iPhone version only.
Note: If a client does not have any contact details, they will not appear in the Mail Centre.
Details for each booking are shown in the Mail Centre along with how many reminders for this booking have been sent.
A generic reminder format is provided by default, however this can be changed at any time to suit your own requirements by accessing the Reminder Format screen in the Mail Centre.
Reminder Format
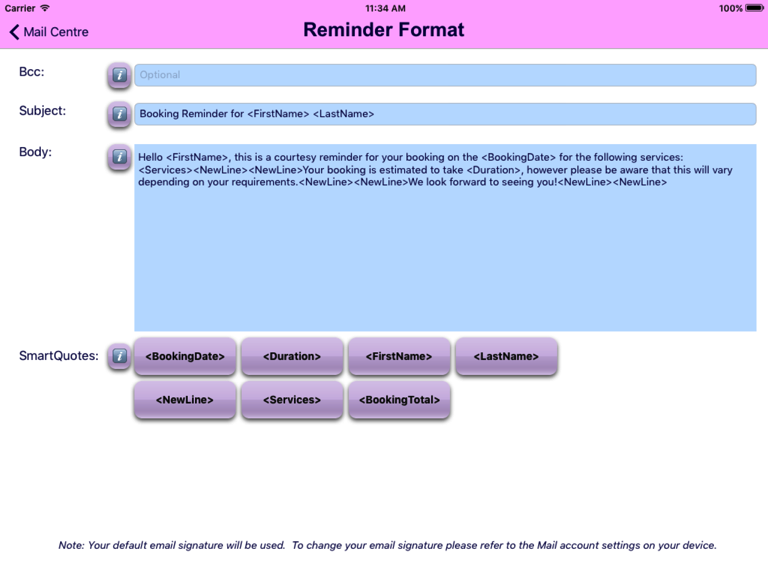
There are three values available:
1. Bcc - You can choose to enter a default Bcc email for example, if you wanted to send a copy of each reminder to yourself as a reference. (email only)
2. Subject - This will be the subject line for every reminder. (email only)
3. Body - This is the email or message body.
SmartQuotes
This is a powerful way of personalising each reminder without the need to edit reminders individually before sending them.
To insert a SmartQuote, first select the location within either the subject or body text where you want the SmartQuote to be located.
You can then touch a button to insert.
If you would rather type in SmartQuotes manually, it is important to know that they do not contain any spaces, they are case sensitive and must be contained within the lesser and greater than symbols < >.
There are seven (7) SmartQuotes available:
1. <BookingDate> - This inserts the booking date and time.
2. <Duration> - This is the estimated booking duration based on the total service duration and any preparation time you may have.
3. <FirstName> - The client’s first name.
4. <LastName> - The client’s last name.
5. <NewLine> - This denotes a single carriage return. If you want one blank line between paragraphs, you should put two of these back to back like this: <NewLine><NewLine>
6. <Services> - All of the services the client is having done during their booking.
7. <BookingTotal> - The booking total.
SmartQuote Example:
Hello <FirstName>, this is a courtesy reminder for your booking on the <BookingDate> for the following services: <Services><NewLine><NewLine>Your booking is estimated to take <Duration>, however please be aware that this will vary depending on your requirements.<NewLine><NewLine>We look forward to seeing you!<NewLine><NewLine>
The default email signature will be used for your reminders. To change your email signature please refer to the Mail account settings on your device.
Loyalty Points
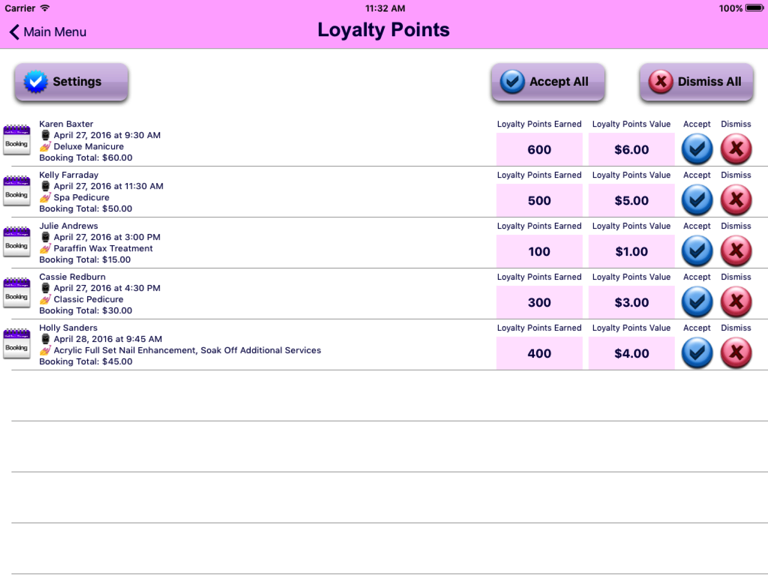
Using the Loyalty Points system is optional, however you can begin using it at any time.
Default settings are initially set for you, but these can be changed in the Loyalty Points Settings located in the Loyalty Points screen.
Changing the Loyalty Points Settings will alter how points are earned and their value in your local currency.
Loyalty Points Settings
Minimum Loyalty Points Required (defaults to 1000)
The minimum points required before they can be redeemed for a booking.
Loyalty Point Earning Threshold (defaults to 10.00)
Points are earned each time the threshold divides fully into the booking total (after discounts).
Loyalty Points Awarded (defaults to 100)
The number of points earned for each threshold met.
1 Loyalty Point Value (defaults to 0.01)
Each point is valued at this amount in the local currency.
For every 10.00 spent, 100 Loyalty Points are earned, worth 0.01 each (local currency).
The default settings provide points with the equivalent value of 10% discount.
It is recommended that you verify or change these settings as soon as you decide to start using the Loyalty Points system.
Note: If you choose values that would result in you running at a loss, A LARGE WARNING IN RED is given.
Earning Loyalty Points
A client earns points when bookings are completed, however you must Accept these points on the Loyalty Points screen for them to be credited to their Client Card.
Note: You cannot earn points for a booking and redeem those same points in the same booking.
Accepting or Dismissing Loyalty Points
On the Loyalty Points screen, you can Accept or Dismiss Loyalty Points earned for each booking. You can do this individually or you can use the Accept All or Dismiss All buttons.
You will be prompted when using the Accept All or Dismiss All buttons but you will not be prompted for individual decisions.
The decisions you make are final and you will not be asked about the same booking again.
Redeeming Points
You can redeem Loyalty Points on the Bookings screen for Active or Completed bookings.
Once a client has met the criteria you have set, you can choose to redeem as many points as you like, up to the value of the current booking.
The value deducted from the booking will be shown as the Redeemed Value.
You may also decide to remove any existing discounts.
Manually Adjusting Loyalty Points
Each client has a Loyalty Point balance in their Client Card. When Loyalty Points are Accepted or Redeemed, these points are added to or deducted from.
At any time you can manually adjust the balance for any client by changing this value in their Client Card.
This could be used for special offers/birthdays etc. or any other reason you may have to increase or decrease their balance outside of the booking system.
Export
You can export your Services, Clients, Bookings or Stock data as a comma delimited .csv file.
This file can be emailed and then opened in any spreadsheet program so you can do your own analysis of your data.
AVAILABLE OPTIONS
PREVENT DOUBLE BOOKINGS
If this is set to Yes and you attempt to create a booking that conflicts with another you will be notified. You will need to choose a different time or date for the booking to be saved. If it is set to No, you can create as many bookings as you like in the same time period. Please note however that events you create manually through the Calendar App that use the Nail Tech Manager Calendar Type (for holidays etc.) will still prevent bookings during that period regardless of this setting.
PREVENT EDITING OF COMPLETED BOOKINGS
You can use this setting to provide some protection against accidentally changing old booking records. If this is set to Yes, completed bookings will become protected and cannot be changed. To enable editing again, set this to No.
ADD CLIENT ADDRESS TO CALENDAR EVENT
Useful for Mobile Nail Technicians, you can enable this option to add client addresses (from their Client Card) to any new booking. When you view an individual booking in the Calendar App, you can touch the client address to have it open in the Maps App (by Apple) - ready to give you driving directions from your current location.
DISPLAY COMPLETED BOOKINGS
If you set this to No and a booking period has ended, a completed booking will automatically disappear from the Bookings screen.
To see all completed bookings again, set this back to Yes.
ADD PREPARATION TIME BETWEEN BOOKINGS
When set to Yes, the Preparation Time below is added to the booking duration total. Otherwise if set to No, the Preparation Time below is ignored and booking durations are the exact total of the combined service durations.
PREPARATION TIME (IN MINUTES)
See above.
AUTOMATICALLY CREATE A REMINDER ALARM WHEN CREATING A BOOKING
If set to Yes, a reminder alarm is created with each booking using the amount of notice below. Otherwise if set to No, no alarm is set.
HOW MUCH NOTICE IS NEEDED (IN MINUTES)
See above.
HOW MANY PREVIOUS WEEKS TO DISPLAY?
You can choose between 0-52 weeks to display prior to the current week on the built-in Calendar screen.
ALLOW DELETION OF SERVICES, CLIENTS, BOOKINGS AND STOCK
You can use this setting to control whether Services, Clients, Bookings and Stock Items can be permanently deleted. If you want to protect your records from accidental deletion, set this option to No. Otherwise, setting this to Yes will allow you to swipe right-to-left across on the item to reveal a Delete button.
COLOUR SCHEME
Choose from Dark, Light, Plain or Flux.
EMAIL SUPPORT
You can use this button to email the developer directly, without leaving the App.